


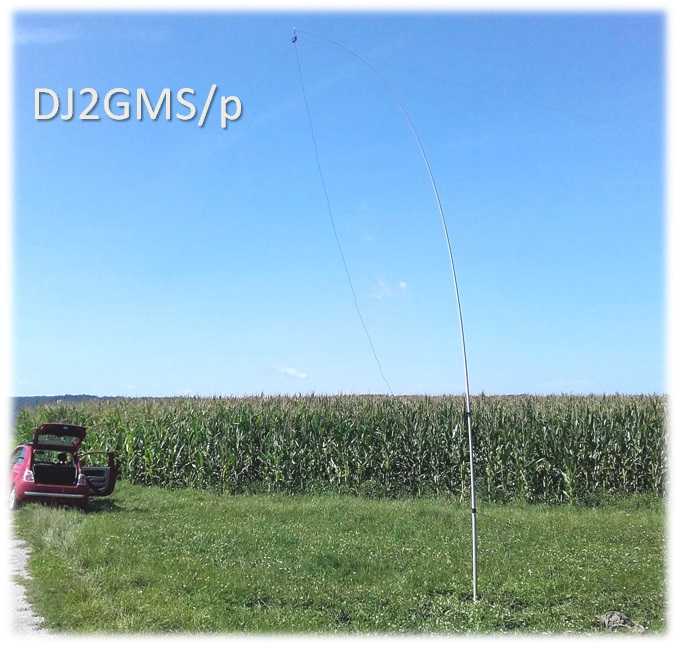
DJ2GMS/p
Jens was not fully happy with the antenna, but it is only fair when we show all user feedback including those with negative comments.
THANK YOU JENS for your honest opinion.
However, at the end of his report, I will add a reply (in English) to each of the points which troubled Jens, including tips to improve the operation.
This is currently in GERMAN. I will translate it later and after Jens approves the translation, I will post it here below his German text.
Hallo Rick,
heute bin ich dazu gekommen mal die o.g. Antenne erstmalig zu testen.
Vorweg möchte ich sagen das ich das Ganze aus der Sicht des Portabelfunkers gemacht habe. Heisst für mich das Equipment leicht zu tragen und
leicht und schnell von einer Person aufgebaut werden können ( rapid deployment ).
Handwerklich ist die Antenne sehr gut gemacht, stabil und leicht ( meine wog ca.380gr.)
1Die Ringöse zur Befestigung erfordert etwas Nachdenken ist aber
mit etwas Basteln leicht zu lösen.
2Was mir sofort auffiel waren die fehlenden "extension ropes" nach
den Drähten. Hier würde ich mir wünschen das diese gleich in der richtigen Länge dabei sind, zum Glück hatte ich noch 2mm Dyneema rumliegen.
Aufbau: Dieser gestaltete sich dann doch schwieriger und aufwendiger als gedacht. Alles in allem habe ich ca. 30 Minuten gebraucht, was für meine Ansprüche viel zu lange
ist.
3Die Drähte und das Koaxkabel haben sich sofort verheddert was schonmal zum gewissen Frust führte. Warum sind keine "wire winder" dabei? Ich weiss das macht fasst keiner, ich kenne nur einen Hersteller der diese mit liefert. Aber ohne diese Teile ist die Antenne alleine und bei Wind zumindest für mich nur sehr schwer aufbaubar.
4Und dann ist ein wirklich stabiler GFK Mast unerläßlich! Mein üblicher kleiner Portablemast ist definitiv nicht
geeignet und hat sich bestimmt 2m nach unten gebogen unter der Last der Balunbox.
5Das nächste Mal nehme ich mal meinen superstabilen( in 8m Höhe
20mm Durchmesser ) und dafür auch 2kg schweren GFK Mast mit. Der ist natürlich zu mitnehemn viel zu schwer so das diese Antenne wohl meine Wohnmobilantenne werden wird.
Mein persönliches Fazit: Für richtigen Portabeleinsatz und allein weniger geeignet.
Wenn ich irgendwo mit dem Auto hinfahre und zwei oder drei Helfer habe und es auf die Aufbauzeit nicht ankommt eine tolle Antenne, wenn sie mal steht.
Wirewinder sind ein Muß. Ebenso würde ich mir wünschen das die Verlängerungsschnüre gleich
dabei sind.
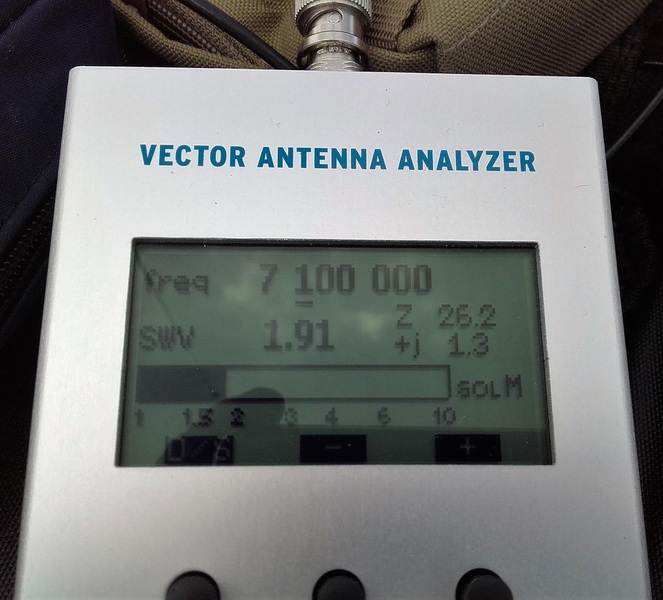
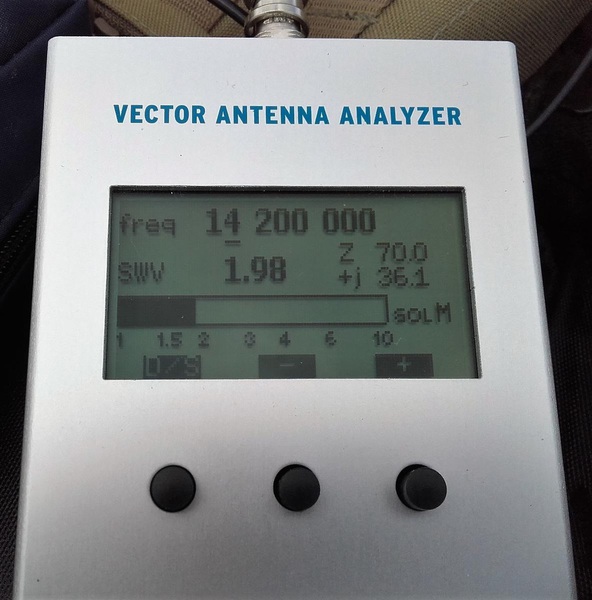
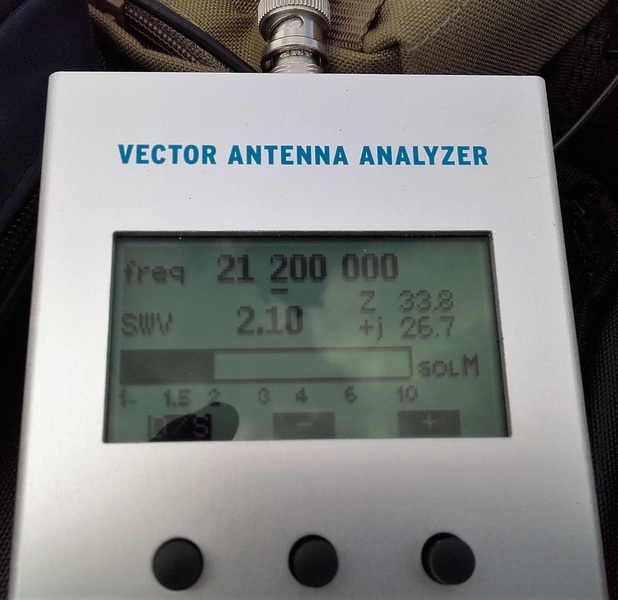
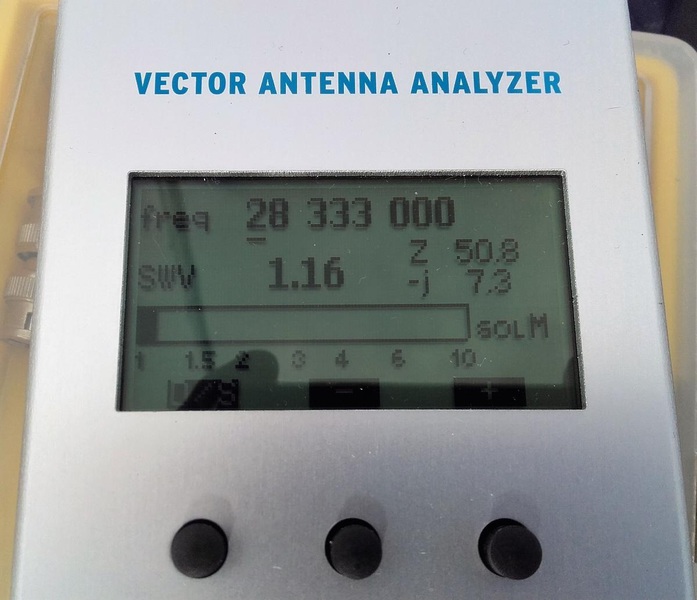
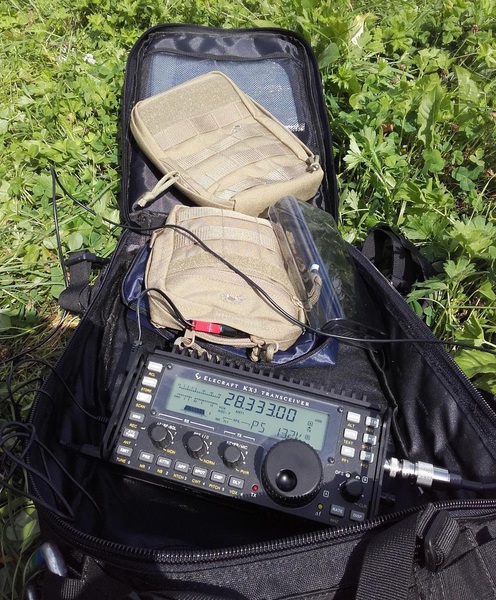
Funkbetrieb: Unter den jetzigen miesen Bedingungen konnte ich mit 5 Watt in SSB QSOs mit ganz Europa machen. Das SWR war mit 6m Aufbauhöhe auf 40/20/15 kleiner 2:1, auf 10m
1:1!. Die Resonanzpunkte werde ich nächstes Mal mal messen.
Dies ist ein ehrlicher persönlicher Testbericht und ich hoffe das ist ok für Dich.
Im Anhang noch ein Bild
vy 73 de Jens DJ2GMS
The Aerial-51 reply to all of the points that Jens made are below.
In the meantime Jens has read my reply and gained more experience using some of his own ideas. Here is his second email to us (this time in English):
Hi Rick,
I just want to share my further, much more positive, experiences with your antenna:
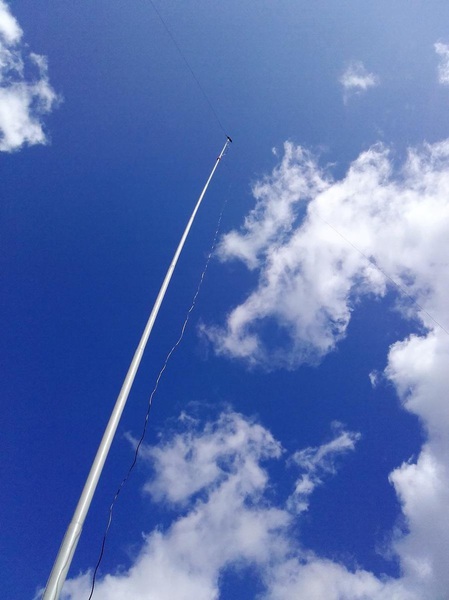
I reactvated my old heavy duty 10m GFK mast, top element 17mm ( which I think is the absolut minimum). I found an easy way of fixing the Balun. Then tensioning the two dipole arms away from the mast ( as you mentioned..) makes erecting the antenna easy and I was ready in about 10minutes!
We had a strong wind we had today. Not spiraling the coax around the mast let it flex a little, but after spiraling the coax down the mast it was completely straight even just guying the mast at appr. 1,5m height!
I am now very happy with the installation and you can find some pics and measurements on my portable qrz.com page (DJ2GMS/p)
So thanks for your very helpful tips and please feel free to share these addtional comment.
Vy 73 de Jens DJ2GMS
DJ2GMS's PHOTO GALLERY:


NOTE from DJ0IP: These are the kind of pictures that make me want to grab my "Go-Bag" and run to the field!
RESPONSE FROM DJ0IP
ALL of the points Jens flags in his first email are important to him, therefore they are important to me. I'm sure many of the "over 500" users of the Model 404-UL have had similar thoughts on some of these points.
I will translate these points into English and address each with comments:
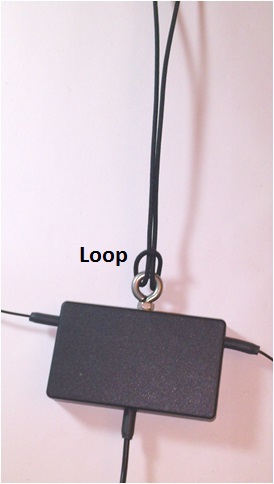
1). The eyelet at the top of the Balun requires consideration and a bit of improvisation.
This is a fair point. Several of our over 500 users (July 2017) have expressed the wish for something else, but we got multiple different requests.
The problem when producing a product is, you can't find one solution that pleases everyone.
The eyelet bolt at the top is pretty much the industry standard method for attaching wire antennas to masts, trees, whatever.
The picture on the right shows how I do it. In the "Construction Tips" section of my web, I will show a bit more information on how to do it this way.
People who always use the same portable pole will have an idea how it should be done. I happen to use 3 different poles with this antenna, depending on the destination. I have one for travel by car (Spiderbeam 12m fiberglass pole), a lighter and shorter one for short up-hill excursions where I don't have to walk too far or too long, and a 3rd very light mini-pole for backpacking.
My solution enables me to easily tie the antenna to anything. It takes me just 20 seconds to wrap the two thin ropes around the pole a couple of times and tie a square knot.
2) Missing extension ropes for the ends of the dipole. It would be better if the antenna came including these ropes, pre-cut to the correct length.
Extension ropes were not included because different operators use the antenna in different ways and their needs differ. If we include rope or line with the antenna, it will not be suitable for all applications and users will complain that they are paying for something which they do not need.
Even if we did include rope, how do we know what "the correct length" is? When operating portable, I use a different length almost every time because the available tie-point (tree, bush or fense) is different in each case.
Many of our users deploy the antenna in fixed installations at home. In this case, Spiderbeam's 1mm Kevlar rope is perfect. Their 2mm Kevlar is also a good choice. However these come in fixt lengths and are relatively expensive for using in temporary, portable applications.
For portale and temporary applications, I use 1.5mm line which I bought at the local hardware store (d-i-y home repair store). I paid about $3 for 50 meters (160 ft.) of this rope.
Spiderbeam offers a "GoPAK" (Go Portable Accessory Kit) which includes the anttenna, a 12m fiberglass pole, 6 plastic ground stakes and a heavy duty "kite string" for tying the ends of the antenna. I haven't tried their kite string yet. It should be fine for temporary operations..
3) The wires and coax got tangled immediately which frustrated me. Why is there no wire winder included?
In this case I must admit that I fully agree with Jens on his first finding (tangled wires). A bit of explanation is certainly necessary here.
First, the primary two goals of the antenna were "good performance" and ultra-lightweight. We need ultra-lightweight in order to raise the antenna high in the air. The higher it is, the better it will perform.
Making the antenna full-size with no lossy traps or coils was also done in the interest of maintaining high performance. A long thin lightwire can easily break unless care is taken in the choice of wire. Insulated standed Copper-Weld wire was chosen. It is CQ-534, 26-AWG. It is lightweight, yet rugged.
Unfortunately this wire tends to kink easily unless you are very careful when installing the antenna or packing it away.
Second, the coax chosen is RG-174 HCU (also sold by DX-Wire as DXW-174) because it has much lower loss on the low bands than standard RG-174 CU. This coax has a solid inner conductor whereas RG-174 CU has a stranded center conductor. The "CU" is much more flexible than "HCU" but HCU was chosen because of its better performance.
(NOTE: Since 2018, RG-174-HCU is no longer being manufactured. Since our supply of HCU was eshausted, we began using RG-174 coax in this antenna.)
THE USE OF WINDERS, such as the two plastic hasps which Spiderbeam offers as an option for this antenna is HIGHLY RECOMMENDED. In addition, care must be taken in "how" you use the winders. More on that below.
Once again we had the problem that not everyone wants to pay for winders and not everyone wants the same kind of winder. Some people already have winders and others wishing to put the antenna up in a permanent installation do not need winders. Therefore the winders are offered as an option.
In order to keep the size of the antenna small for shipping, the wires and coax were wound on a very small, round form. Better is a larger form. When you unwind these for the very first time, a lot of care should be taken.
THEN WIND THEM ONTO WINDERS AS FOLLOWS:
- Spread the antenna out in the field like a normal flat-top dipole. Run the coax at a 90 degree angle away from the wires.
- Fasten the balun to anything that will keep it in place.
- Beginning with one of the legs, secure the insulator (or end of the line if you wish to wrap the line together with the antenna legs), and then rotate the winder in your hand as you walk towards the center of the antenna. When you reach the balun, fasten the winder to the balun. Use string or wire-tie, whatever.
- Now using a second winder, wind the other leg of the antenna exactly like you wound the first leg. When you reach the balun fasten it again.
- Finally, using a 3rd winder, begin at the end of the coax and wind towards the balun. Fasten when finished.
- OR, what I do, I simply hold the two winders together and wind the coax around the two together.
WHEN INSTALLING THE ANTENNA:
- If you used 3 winders, secure the balun to a fixed point, (i.e. the pole).
- If you wound as I do, then you must unwind the coax first and lay it out in a straight line, perpindicular to how the wire legs will be run.
- Then fasten the balun to the pole.
- Unwind the first leg of the antenna in the direction it will run, ROTATING the winder in your hands as you walk. When it is fully extender, leave it lying on the ground in a straight line.
- Unwind the second leg of the antenna in the opposite direction, ROTATING the winder in your hands as you walk. When it is fully extender, leave it lying on the ground in a straight line.
- If you haven't already done so, fasten the extension ropes/lines to the two ends of the antenna.
- Telescop the pole upwards, one segment at a time. Normally the wire legs will not tangle with each other. NOTE: in high winds, I tie a small 4 ounce fishing weight to the far ends of the lines to keep tension on them while telescoping the pole upwards.
- Tie off the ends when the pole is fully extended.
IN SUMMARY:
Although Jens brings up good points, the possibility of tangling wires is a trade-off in the interest of higher performance and ruggedness.
Wire Winders are a great improvement for working with the antenna but it was impossible to find one solution that pleases everyone.
We are very grateful to Jens for sharing his negative and positive experiences with us. Thank you Jens.
4) A strong Fiberglass Pole is a MUST. My portable pole is not suitable for use with this antenna.
5) Next time I will take my super-stable pole where I can mount the antenna at a height of 8 meters.
Well, YES. Spiderbeam makes and sells excellent Fiberglass poles. The Model 404-UL was primarily designed to be used with Spiderbeam's 12m Fiberglass pole, but of course it may be used with all kinds of other poles, or even trees.
Often I leave the bottom two segments and the top segment of the 12m spiderpole at home and just use the bits in the middle. It is still 9m high, very sturdy, and noticeably lighter thant the full 12m pole.
Jens was not complaining here, he was only pointing out that you do need a relatively strong pole for this antenna.
SPIDERBEAM IS PLANNING TO BRING OUT A NEW "HD Mini Pole" early in 2018.